If you’re working on the initial setup of a Cisco FTD 2100 for further registration to an FMC for management, this is a post for you.
In this post, I am going to walk you through the initial configuration of a Cisco FTD 2100 and how to connect and add an FTD to an FMC.
Table of Contents
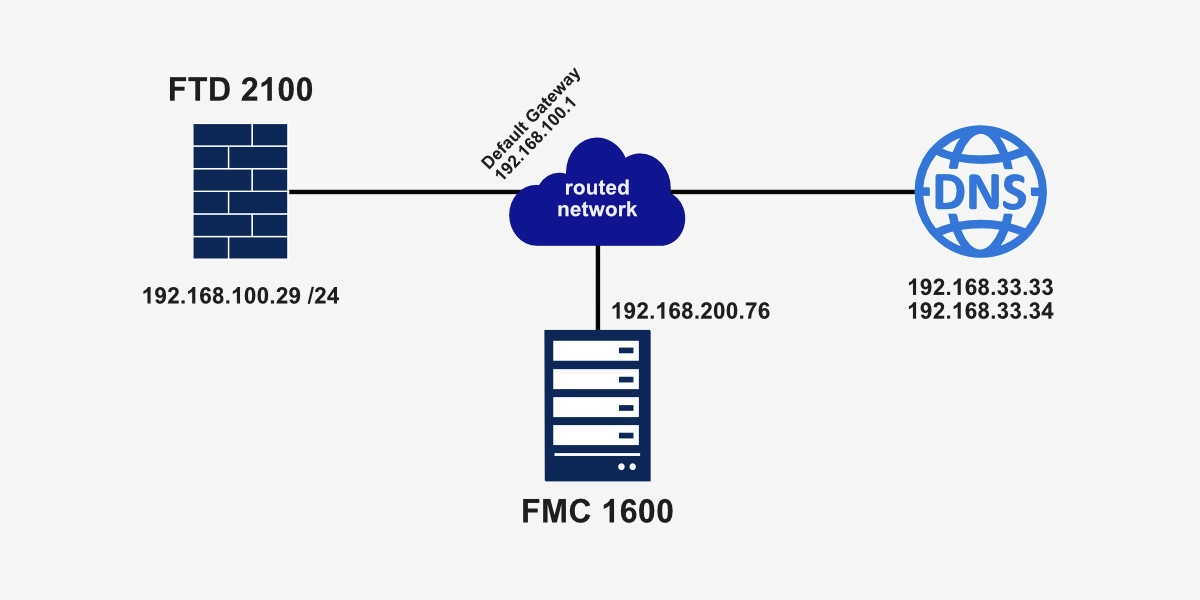
Here’s a quick reference diagram for today’s post.

Advertisement
Cisco FTD 2100 Initial Setup
Connect to the console port at 9600 baud and turn on the FTD 2100. Once the FTD requires login credentials, enter the following FTD default username and password:
- Username: admin
- Password: Admin123
Once you land to the firepower# prompt, enter connect ftd and hit enter. You’ll need to enter the following information:
- Do you want to configure IPv4? (y/n) [y]: y
- Do you want to configure IPv6? (y/n) [y]: n
- Configure IPv4 via DHCP or manually? (dhcp/manual) [manual]: <dhcp_or_manual>
- Enter an IPv4 address for the management interface []: <your_IP_address>
- Enter an IPv4 netmask for the management interface []: <your_network_mask>
- Enter the IPv4 default gateway for the management interface [data-interfaces]: <your_default_gateway>
- Enter a fully qualified hostname for this system [firepower]: <your_hostname>
- Enter a comma-separated list of DNS servers or ‘none’ [208.67.222.222,208.67.220.220]: <your_DNS_servers>
- Enter a comma-separated list of search domains or ‘none’ []: <your_search_domains>
In this case, there’s no need for IPv6 configuration; however, if you do need to use IPv6, you choose y on the “Do you want to configure IPv6?” question.
IMPORTANT: If your FTD 2100 will be managed by an FMC, you need to enter no when asked whether you want to manage the device locally.
- Manage the device locally? (yes/no) [yes]: no
Follow the example below:
firepower login: admin
Password:
Last login: Wed Jan 19 16:50:44 UTC 2022 on ttyS0
Successful login attempts for user 'admin' : 1

Copyright 2004-2020, Cisco and/or its affiliates. All rights reserved.
Cisco is a registered trademark of Cisco Systems, Inc.
All other trademarks are property of their respective owners.

Cisco Fire Linux OS v6.6.1 (build 14)
Cisco Firepower 2110 Threat Defense v6.6.1 (build 91)

Hello admin. You must change your password.
Enter new password: 3nt3rN3wPa$$w0rd
Confirm new password: 3nt3rN3wPa$$w0rd
Your password was updated successfully.

<cropped>

firepower#
firepower#
firepower# connect ftd
You must accept the EULA to continue.
Press <ENTER> to display the EULA:
End User License Agreement

Effective: May 22, 2017

<cropped>

Please enter 'YES' or press <ENTER> to AGREE to the EULA:  YES

System initialization in progress.  Please stand by.
You must configure the network to continue.
You must configure at least one of IPv4 or IPv6.
Do you want to configure IPv4? (y/n) [y]: y
Do you want to configure IPv6? (y/n) [y]: n
Configure IPv4 via DHCP or manually? (dhcp/manual) [manual]: manual
Enter an IPv4 address for the management interface []: 192.168.100.29
Enter an IPv4 netmask for the management interface []: 255.255.255.0
Enter the IPv4 default gateway for the management interface [data-interfaces]: 192.168.100.1
Enter a fully qualified hostname for this system [firepower]: inet-fw-01
Enter a comma-separated list of DNS servers or 'none' [208.67.222.222,208.67.220.220]: 192.168.33.33,192.168.33.34
Enter a comma-separated list of search domains or 'none' []: none
If your networking information has changed, you will need to reconnect.
Setting DNS servers: 192.168.33.33,192.168.33.34
No domain name specified to configure.
Setting hostname as inet-fw-01
Setting static IPv4: 192.168.100.29 netmask: 255.255.255.0 gateway: 192.168.100.1 on management0
Updating routing tables, please wait...
All configurations applied to the system. Took 3 Seconds.
Saving a copy of running network configuration to local disk.
For HTTP Proxy configuration, run 'configure network http-proxy'

Manage the device locally? (yes/no) [yes]: no
DHCP Server Disabled
Configure firewall mode? (routed/transparent) [routed]:
Configuring firewall mode ...


Update policy deployment information
    - add device configuration
    - add network discovery
    - add system policy

You can register the sensor to a Firepower Management Center and use the
Firepower Management Center to manage it. Note that registering the sensor
to a Firepower Management Center disables on-sensor Firepower Services
management capabilities.

When registering the sensor to a Firepower Management Center, a unique
alphanumeric registration key is always required.  In most cases, to register
a sensor to a Firepower Management Center, you must provide the hostname or
the IP address along with the registration key.
'configure manager add [hostname | ip address ] [registration key ]'

However, if the sensor and the Firepower Management Center are separated by a
NAT device, you must enter a unique NAT ID, along with the unique registration
key.
'configure manager add DONTRESOLVE [registration key ] [ NAT ID ]'

Later, using the web interface on the Firepower Management Center, you must
use the same registration key and, if necessary, the same NAT ID when you add
this sensor to the Firepower Management Center.
>
>
>
Now, that the FTD 2100 has been assigned an IP address, check whether you can ping that IP. The out-of-band management port (2 on the image below) will need to be connected to the network and your network will need to be able to route your PC’s IP to the FTD’s.

Now it’s time to register the FTD to the FMC management server.
Advertisement
Cisco FTD 2100 FMC Registration
Your newly configured FTD’s IP address will need to be routable to the FMC’s IP address. To connect the FTD to the FMC, you need to enter the following command at the prompt:
configure manager add <FMC_IP_address> <made_up_registration_key>
See the example below.
> configure manager add 192.168.200.76 123456
Manager successfully configured.
Please make note of reg_key as this will be required while adding Device in FMC.

>
Manager successfully configured.
Please make note of reg_key as this will be required while adding Device in FMC.

>
Now you need to jump on the FMC and Add a Device.
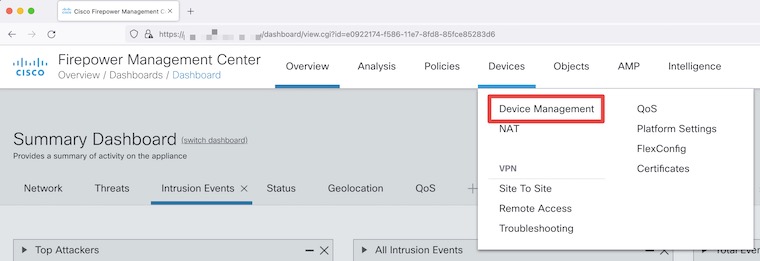
Once on the home screen of your FMC, select Devices and then Device Management.

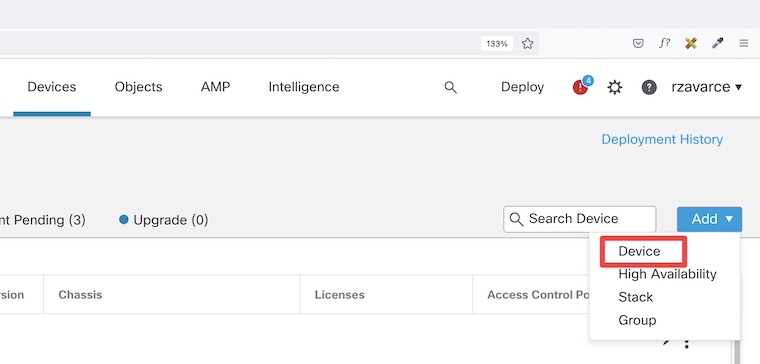
Now, click on Add Device.

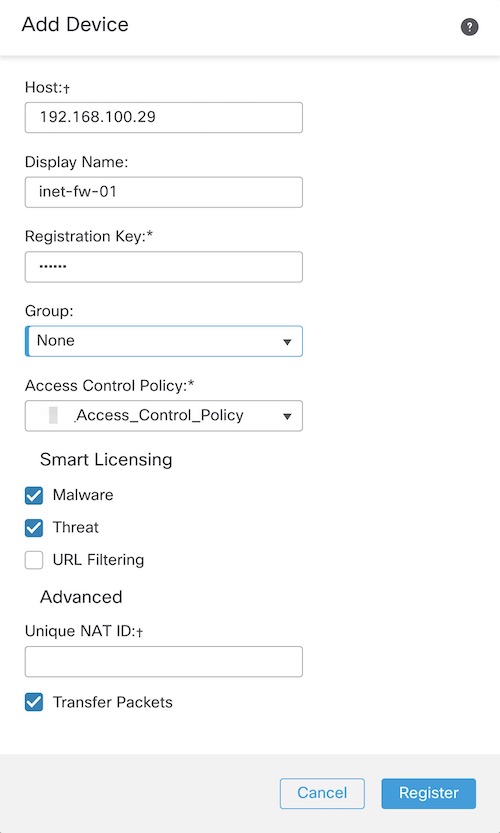
On the Add Device pop-up window, enter the corresponding data including the registration key. Select your group, access control policy, and license accordingly.

And at this point, the FMC should establish communication with your FTD and add the FTD to the device list.
I hope this post was helpful.
If you have any questions, please leave a comment below.
Getting CCNA or CCNP Certified?

Self-paced Books. On-demand Courses. Practice Tests.
Sign up for a 10-day free trial with unlimited access!
