In this short post, I’ll give you the configuration script I put together to configure Smart Licensing on a Cisco Nexus 9000 switch.
Nexus Smart Licensing Configuration Script
In the following configuration script, I provide the CLI commands I use to configure Smart Licensing on a Nexus 9000 switch using its out-of-band (OOB) management interface that’s under the default VRF management.
To avoid any issues when registering your Nexus switch, make sure that name servers are reachable over the management VRF before entering the token.
config terminal

ip domain-lookup

interface mgmt0
 ip address <mgmt_IP_address>/<mask_bits>
 no shut
 exit

vrf context management
 ip route 0.0.0.0/0 <default_route_next_hop>
 ip domain-name <customer_domain.local>
 ip name-server <your_DNS_server>
 exit

license smart vrf management <<<< this is the default - showing the command for you to be aware
license smart transport smart
exit

license smart trust idtoken <token> all <<<< "all" for all Supervisors
If you have two supervisor cards, the token you create should allow two uses. See next section below on creating a Smart License token.
These are show commands that you can use to verify the configuration.
show license status
show license summary
show license all
show license tech support
show license udi
show license usage
When you display the default configuration for license smart, you’ll see that the default transport is cslu and that needs to change to smart. Also, notice the vrf management is the default.
nexus-switch#  show runn all | inc "license smart"
license smart transport cslu
license smart url smart https://smartreceiver.cisco.com/licservice/license
license smart url cslu cslu-local
license smart usage interval 30
license smart vrf management
no license smart source-interface
nexus-switch#
Here’s the show license status output BEFORE configuring smart licensing.
nexus-switch# show license status
Utility:
    Status: DISABLED

Smart Licensing using Policy:
    Status: ENABLED

Data Privacy:
    Sending Hostname: yes
    Callhome Hostname Privacy: DISABLED
        Smart Licensing Hostname Privacy: DISABLED
    Version Privacy: DISABLED

Transport:
    Type: CSLU
    Cslu address: cslu-local
    VRF: management

Policy:
    Policy in use: Merged from multiple sources
    Reporting ACK required: Yes
    Unenforced/Non-Export:
        First report requirement (days): 90 (CISCO default)
        Ongoing reporting frequency (days): 365 (CISCO default)
        On change reporting (days): 90 (CISCO default)
    Enforced (Perpetual/Subscription):
        First report requirement (days): 0 (CISCO default)
        Ongoing reporting frequency (days): 0 (CISCO default)
        On change reporting (days): 0 (CISCO default)
    Export (Perpetual/Subscription):
        First report requirement (days): 0 (CISCO default)
        Ongoing reporting frequency (days): 0 (CISCO default)
        On change reporting (days): 0 (CISCO default)

Miscellaneous:
    Custom Id: <empty>

Usage reporting:
    Last ACK received: <none>
    Next ACK deadline: Jan 11 15:48:57 2024  EST
    Reporting push interval: 30 days
    Next ACK push check: <none>
    Next report push: Nov 22 06:37:54 2023  EST
    Last report push: <none>
    Last report file write: <none>

Trust Code installed: <none>


nexus-switch#
This is what you should see AFTER you configure Smart Licensing on a Cisco Nexus switch. The Trust Code should update in about ten seconds, but the Usage Reporting section should completely update in about ten minutes.
nexus-switch# show license status
Utility:
    Status: DISABLED

Smart Licensing using Policy:
    Status: ENABLED

Data Privacy:
    Sending Hostname: yes
    Callhome Hostname Privacy: DISABLED
        Smart Licensing Hostname Privacy: DISABLED
    Version Privacy: DISABLED

Transport:
    Type: Smart
    URL: https://smartreceiver.cisco.com/licservice/license
    Proxy:
        Not configured
    VRF: management

Policy:
    Policy in use: Merged from multiple sources
    Reporting ACK required: Yes
    Unenforced/Non-Export:
        First report requirement (days): 90 (CISCO default)
        Ongoing reporting frequency (days): 365 (CISCO default)
        On change reporting (days): 90 (CISCO default)
    Enforced (Perpetual/Subscription):
        First report requirement (days): 0 (CISCO default)
        Ongoing reporting frequency (days): 0 (CISCO default)
        On change reporting (days): 0 (CISCO default)
    Export (Perpetual/Subscription):
        First report requirement (days): 0 (CISCO default)
        Ongoing reporting frequency (days): 0 (CISCO default)
        On change reporting (days): 0 (CISCO default)

Miscellaneous:
    Custom Id: <empty>

Usage reporting:
    Last ACK received: Feb  8 12:57:38 2024  EST
    Next ACK deadline: Feb  7 12:57:38 2025  EST
    Reporting push interval: 30 days
    Next ACK push check: <none>
    Next report push: Mar  9 12:52:38 2024  EST
    Last report push: Feb  8 12:52:38 2024  EST
    Last report file write: <none>

Trust Code installed: Feb  8 12:50:48 2024  EST
    Active: PID: N9K-C93360YC-FX2, SN: FLM273503GJ
        Feb  8 12:50:48 2024  EST


nexus-switch#
This command allows to unregister the switch.
license smart deregister
But now, how do you obtain the token to register with the Smart Account?
Advertisement
How to Create a Smart Account Token?
For Cisco partners, you need to request access to your customer’s Virtual Account. Your customer needs to go to https://software.cisco.com, scroll to Account Administration and click on Manage Account. Click on Users and then the Add Users button.
Once you have access, go to https://software.cisco.com and log in. You’ll need your Cisco username and password. Once on the home page, click on Manage Licenses under Smart Software Manager.

Click on the Inventory link and then on the New Token button.

Add a Description, the number of days you’d like this token active, and how many times you’d like to use this token when registering Cisco equipment. For instance, I normally use a token per device, so if I have two core switches at Site A, I create two tokens, one for Site A Core-A and another one for Site A Core-B. Each token with a Max. Number of Uses of 1; however, you could use the same token for both core switches and have a Max. Number of Uses of 2. I try to add a description that tells me in the future where I used that token.
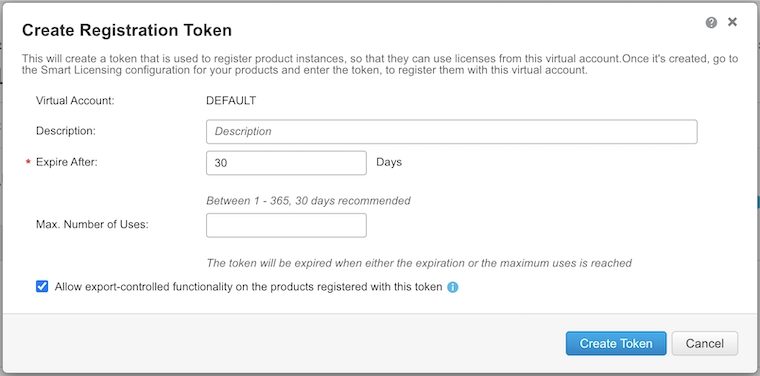
After you click on the Create Token button, you’ll land back at the previous screen. Click on the little blue box with a white arrow to copy the token.

Now you can use this token in the script I gave you in the previous section.
Any questions, please let me know in the comments below.
Getting CCNA or CCNP Certified?

Self-paced Books. On-demand Courses. Practice Tests.
Sign up for a 10-day free trial with unlimited access!

Thanks very much for these smart licensing guides, Cisco’s own documentation, especially for those of us using an on-prem license server, is pretty awful
Hi Andy. After going through these hurdles, I try to break them down and post them in easy-to-understand articles. I’m glad they help. Thank you!