For every new project, the new trend is to configure Cisco smart licensing on your Cisco gear. In this post, I’m going to give you the configuration steps and a couple of quick configuration scripts I put together that I’ve been using lately and successfully.
As a prerequisite, you need to make sure that each device has a management IP address that’s allowed to access the Internet.
Let’s get started.
Table of Contents
Advertisement
Configuration Steps
When configuring a direct connection to Cisco Smart Software Manager (CSSM) on a Cisco device that supports Smart Licensing Using Policy (IOSXE 17.3.2 or newer), you can execute the following step-by-step list to establish a connection with the portal and obtain the licenses:
Configure DNS
Have your Cisco router or switch send DNS lookup queries to your local DNS servers.
router(config)#ip domain lookup
router(config)#ip domain name contoso.local
router(config)#ip name-server 10.4.100.10 10.4.100.11 10.10.98.10
If your management interface that should source DNS queries is on a VRF, configure DNS to source from that interface. I’m using VLAN 201’s SVI as an example.
router(config)#ip domain lookup <== activates DNS look up
router(config)#ip domain lookup vrf Mgmt-vrf source-interface vlan201
router(config)#ip domain name contoso.local
router(config)#ip name-server vrf Mgmt-vrf 10.4.100.10 10.4.100.11 10.10.98.10
If you don’t want to have your Cisco device perform DNS queries, you can also configure static name-to-IP mappings (DNS static entries).
router(config)#ip host smartreceiver.cisco.com 173.36.127.32 192.133.220.120
Cisco’s Smart Licensing Servers at smartreceiver.cisco.com always resolve to the following two IP addresses:
- 173.26.127.32
- 192.133.220.120
Verify the device can reach Cisco’s licensing servers
Licensing servers won’t respond to pings; however, since the communication from the Cisco device to the licensing servers is done over HTTPS, try telnet to smartreceiver.cisco.com over port 443.
router#telnet smartreceiver.cisco.com 443
Trying smartreceiver.cisco.com (192.133.220.120, 443)... Open
quit
[Connection to smartreceiver.cisco.com closed by foreign host]
router#
If your management or source interface is under a VRF, remember to specify the VRF your source interface is on.
router#telnet smartreceiver.cisco.com 443 /vrf Mgmt-vrf
Trying smartreceiver.cisco.com (192.133.220.120, 443)... Open
quit
[Connection to smartreceiver.cisco.com closed by foreign host]
router#
Keep in mind that it could take a while for the Open message to show. Just be patient.
Configure smart transport
The call-home transport can still be used for Smart Licensing Using Policy; however, it’s a legacy method and it is recommended to use Smart Transport instead with the license smart transport smart command.
The license smart url default configures the following URL as the URL contact the Smart License server:
https://smartreceiver.cisco.com/licservice/license
router(config)#license smart transport smart
router(config)#license smart url default
If the communication with CSSM occurs over a particular VRF, you will need to specify the source interface that belongs to that VRF for the HTTP requests. I’m using VLAN 201’s SVI as an example.
router(config)#ip http client source-interface vlan201
In case you are using a PROXY for internet reachability, configure the following commands:
router(config)#license smart proxy address <IP-ADDRESS>
router(config)#license smart proxy port <PORT-NUMBER>
Obtain a token from the CSSM portal
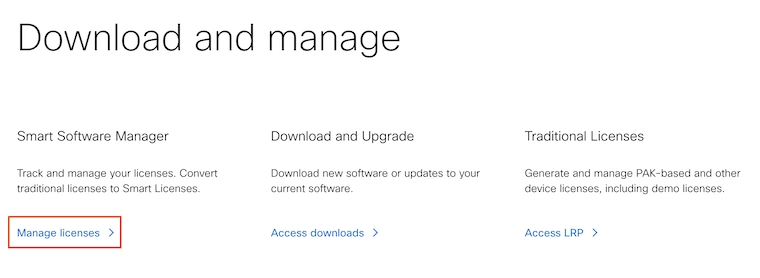
Go to software.cisco.com > Smart Software Manager > Manage licenses. Use your Cisco account to log in.
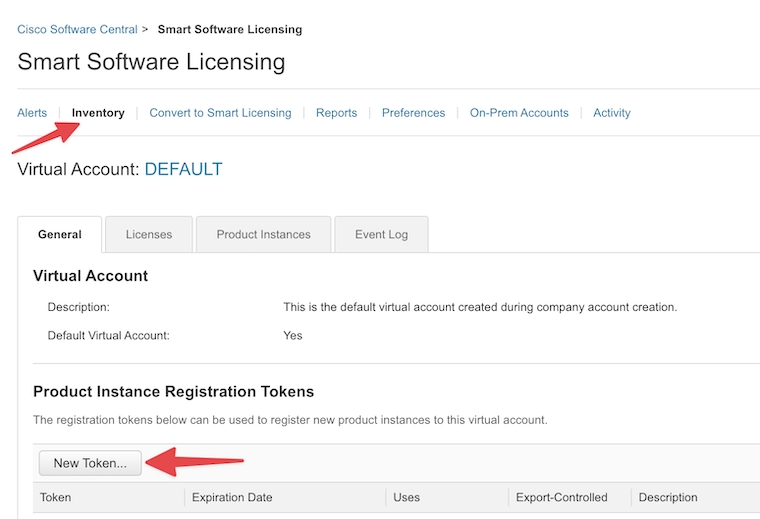
Navigate to Inventory > select the proper Virtual Account > General. And then click on New Token.
Enter a Description. You can use this description to reference the device you’re using the token on. A single token can be used for multiple devices as long as the Max. Number of Uses is bigger than 1.
The default Expire After is 30 days. That means that the token needs to be used before 30 days.
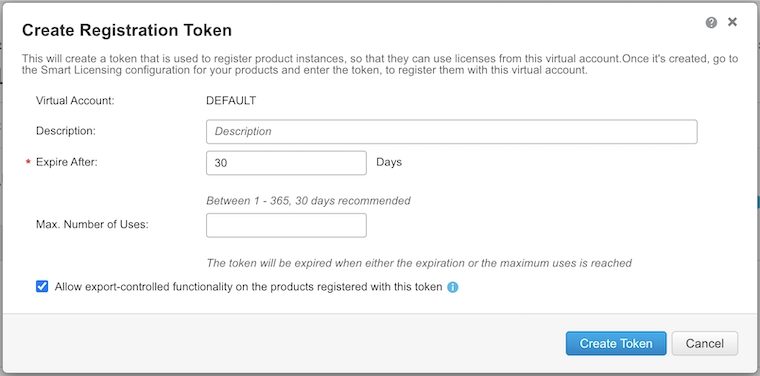
PRO TIP: If you’re using the new token on a stack of multiple switches, the Max. Number of Uses has to match the number of switches within the stack.
Copy the new token to the clipboard by clicking on the blue icon.
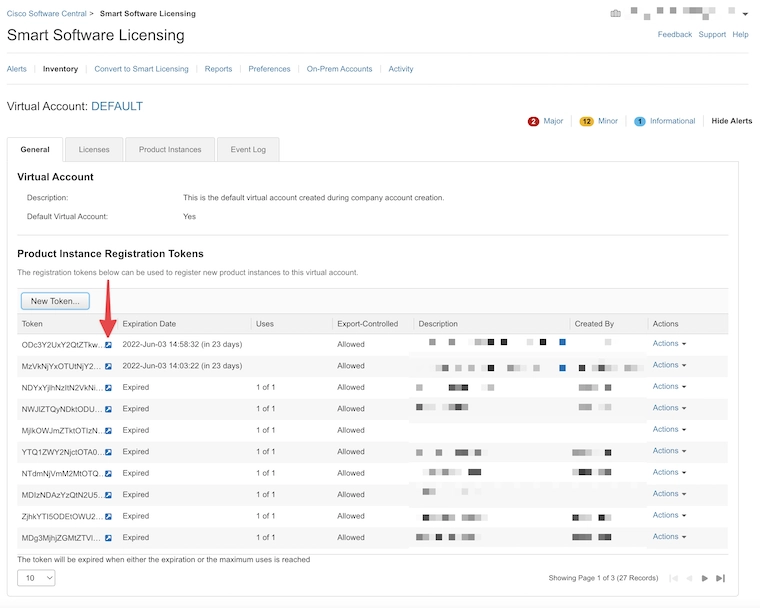
Now, let’s apply the new token to the CLI configuration.
Establish trust with CSSM
With Smart Licensing Using Policy, there is no concept of registration; instead, the device will establish trust with CSSM using the token obtained from the Virtual Account on CSSM.
router#license smart trust idtoken <TOKEN> all force
Let’s take a look at a couple of Cisco Smart Licensing configuration examples and output verifications.
Advertisement
Configuration Example using the Default VRF
Here are the CLI commands to configure smart licensing on your IOS-based Cisco devices that access the Internet over the default VRF.
configure terminal

ip domain lookup
ip domain name domain.local <<<< enter your domain name

ip name-server <dns_IP_1> <dns_IP_2> <<<< enter your DNS servers' IP addresses

license smart transport smart
license smart url default
end
write

license smart trust idtoken <smart_account_token> all force <<<< enter the corresponding token issued on your Smart Accourt portal
This configuration above applies when the management IP address is on the default VRF. Let’s take a look at the smart licensing configuration when the management IP address is under another VRF such as the management VRF.
Advertisement
Configuration Example using the Management VRF
Here are the CLI commands to configure smart licensing on your IOS-based Cisco devices that access the Internet over the management VRF. In this case, the management VRF is the Cisco default Mgmt-vrf.
configure terminal

ip domain lookup
ip domain name domain.local
ip domain lookup vrf Mgmt-vrf source-interface Gi0/0

ip name-server vrf Mgmt-vrf <dns_IP_1> <dns_IP_2>

ip http client source-interface Gi0/0

license smart transport smart
license smart url default
end
write

license smart trust idtoken <smart_account_token> all force
To verify, issue the following show license status | begin Usage command as shown in the next section.
Advertisement
Verification
To verify, issue the following show license status | begin Usage command. Notice that the registration doesn’t happen immediately. You can see three outputs below to show the changes in the output until you see a value under the Lask ACK received line.
When the token is installed, notice there’s a date and time under the Trust Code Installed field
***** STAGE ONE

switch#show license status | begin Usage
<trunkcated>
Usage Reporting:
  Last ACK received: <none>
  Next ACK deadline: Sep 20 10:46:12 2022 EDT
  Reporting push interval: 30  days
  Next ACK push check: <none>
  Next report push: Jul 25 12:02:04 2022 EDT
  Last report push: <none>
  Last report file write: <none>

Trust Code Installed: Jul 25 15:42:56 2022 EDT
switch#

***** STAGE TWO
***** Notice a value under the "Last report push" field

switch#show license status | begin Usage
<trunkcated>
Usage Reporting:
  Last ACK received: <none>
  Next ACK deadline: Sep 20 10:46:12 2022 EDT
  Reporting push interval: 30  days
  Next ACK push check: Jul 25 15:48:32 2022 EDT
  Next report push: Aug 24 15:43:33 2022 EDT
  Last report push: Jul 25 15:43:33 2022 EDT
  Last report file write: <none>

Trust Code Installed: Jul 25 15:42:56 2022 EDT
switch#

***** STAGE THREE
***** Receiving an ACK happens about 5 minutes after the "Last report push" time

switch#show license status | begin Usage
<trunkcated>
Usage Reporting:
  Last ACK received: Jul 25 15:48:33 2022 EDT
  Next ACK deadline: Oct 23 15:48:33 2022 EDT
  Reporting push interval: 30  days
  Next ACK push check: <none>
  Next report push: Aug 24 15:43:33 2022 EDT
  Last report push: Jul 25 15:43:33 2022 EDT
  Last report file write: <none>

Trust Code Installed: Jul 25 15:42:56 2022 EDT
switch#
Advertisement
Troubleshooting
Here’s a collection of Cisco Smart Licensing troubleshooting commands that have helped me in recent installations:
Verify the HTTPS client
The Cisco device you’re configuring uses its HTTP client to contact the Cisco Smart Licensing server over an HTTPS (TCP 443) session. Make sure the client is attempting to contact the CSSM server.
router#show ip http client history
HTTP client history:
    POST 15:05:31 EDT Mon Sep 19 2022 smartreceiver.cisco.com/licservice/lic...
    POST 15:06:26 EDT Mon Sep 19 2022 smartreceiver.cisco.com/licservice/lic...
    POST 15:11:51 EDT Mon Sep 19 2022 smartreceiver.cisco.com/licservice/lic...
    POST 15:17:12 EDT Mon Sep 19 2022 smartreceiver.cisco.com/licservice/lic...
    POST 15:22:33 EDT Mon Sep 19 2022 smartreceiver.cisco.com/licservice/lic...

router#
Make sure the HTTP client is sourced from the correct interface
The Cisco device needs to source its HTTP client requests from an interface with a configured IP address that’s allowed to access the Internet.
router(config)#ip domain lookup source-interface g0/0 <= using the default VRF

OR

router(config)#ip domain lookup vrf Mgmt-vrf source-interface g0/0 <= using the Mgmt-vrf VRF
Make sure that the source interface is allowed TCP 443 outbound.
Make sure port 443 is open outbound
As mentioned above, the Cisco device’s HTTP client establishes an HTTPS session with the CSSM servers. Make sure that TCP 443 is open in the outbound direction AND that you’re using the correct VRF to make that HTTPS call.
Here’s an example of a failed attempt to establish a TCP call on port 443 over the Mgmt-vrf VRF.
router#telnet smartreceiver.cisco.com 443 /vrf Mgmt-vrf
Trying smartreceiver.cisco.com (192.133.220.120, 443)...
% Connection timed out; remote host not responding

router#
Here’s an example of a successful HTTPS connection.
router#telnet smartreceiver.cisco.com 443 /vrf Mgmt-vrf
Trying smartreceiver.cisco.com (192.133.220.120, 443)... Open
quit
[Connection to smartreceiver.cisco.com closed by foreign host]
router#
Make sure there’s DNS resolution
The Cisco device’s HTTP client makes an HTTPS connection to smartreceiver.cisco.com. Make sure your device can resolve that name to an IP.
The two possible IP addresses for smartreceiver.cisco.com are:
- 173.26.127.32
- 192.133.220.120
Try pinging smartreceiver.cisco.com and see whether the device resolves to an IP. Make sure you source from the right VRF!
This is an example of a successful DNS resolution over the Mgmt-vrf VRF. Smart Licensing servers don’t respond to pings.
router#ping vrf Mgmt-vrf smartreceiver.cisco.com
Type escape sequence to abort.
Sending 5, 100-byte ICMP Echos to 173.36.127.32, timeout is 2 seconds:
.....
Success rate is 0 percent (0/5)
router#
If DNS resolution is not working, make sure that:
- DNS resolution is enabled
router(config)#ip domain lookup
- You have DNS servers configured and under the correct VRF (the VRF where DNS servers are reachable!)
router(config)#ip name-server 10.4.100.10 10.4.100.11 10.10.98.10 <= DNS servers found over the default VRF
router(config)#exit
router#show ip name-servers
10.4.100.10
10.4.100.11
10.10.98.10

router#

OR

router(config)#ip name-server vrf Mgmt-vrf 10.4.100.10 10.4.100.11 10.10.98.10 <= DNS servers found over the Mgmt-vrf VRF
router#config)#exit
router#show ip name-servers vrf Mgmt-vrf
10.4.100.10
10.4.100.11
10.10.98.10

router#
If you don’t want the device to make DNS queries, configure a static DNS entry is configured.
router(config)#ip host smartreceiver.cisco.com 172.26.127.32 192.133.220.120
Make sure the HTTPS is allowed for management
If you have declared a management interface under control-plane host and are allowing SSH only, you’re denying HTTPS traffic from being accepted inbound. You’ll see the HTTP client making HTTPS attempts, but the return traffic will be dropped by the Cisco router or switch.
router#show runn | sec control-plane host
control-plane host
 management-interface Port-channel1.201 allow ssh
router#
Make sure you include HTTPS in addition to SSH.
router#config term
router(config)#control-plane host
router(config-cp-host)#management-interface Port-channel1.201 allow https ssh
router(config-cp-host)#end
router#show runn | sec control-plane host
control-plane host
 management-interface Port-channel1.201 allow https ssh
router#
Reporting Push Interval: 0 (no reporting)
If you have configured Smart Licensing correctly and you get a Reporting Push Interval: 0 (no reporting) on the show license status output, the router or switch doesn’t have anything license to validate. That’s totally normal.
router#show license status | beging Usage

Usage Reporting:
  Last ACK received: <none>
  Next ACK deadline: <none>
  Reporting push interval: 0 (no reporting)
  Next ACK push check: <none>
  Next report push: <none>
  Last report push: <none>
  Last report file write: <none>

Trust Code Installed: Oct 03 11:27:41 2022 EDT


router#
So, don’t panic. When you see a Trust Code Installed date, the router or switch was able to contact the Smart License server.
Getting CCNA or CCNP Certified?
Self-paced Books. On-demand Courses. Practice Tests.
Sign up for a 10-day free trial with unlimited access!
Wrapping Up
I hope this post was helpful. You should have a good understanding of how to configure Cisco Smart Licensing on your Cisco IOS device.
We covered configuration steps, two configuration examples using the default and a specific VRF, verification commands, and troubleshooting steps.
If you have any questions or comments, please let me know below.

Good morning Sir I really appreciate your post it helps a lot,
but I want to know when we finish registering into the SCCM server the moment to turn the device in to production access to the internet won’t be allowed.
Will this aspect have an impact on the licensing?
I don’t think it’ll impact anything, but you could convert from Smart Licensing to Traditional Licensing. Or you can also install a local licensing server to manage your Smart Licenses. That server would need Internet access but you could have that server sitting behind a firewall.
Thanks for your advice i will consider your solution since it will be the best option in a scalability perspective.